This is a program guide to make Headcam videos with map and route choice overlay from a orienteering map.
The program can handle that the video is split in parts by the camera, like GoPro does, and will combine the files to one video as part of the proces.
It also have stabilizing and filter capabilities.
The program requires Quickroute to make the route overlay data.
Instructions for using Quickroute for the application:
The Quickroute program itself is made to combine an O-map in JPG format (image) with a .gpx (GPS) file from a running watch.
In the program you can adjust the GPS route to the map and insert split times / stretch times for each record, this must be done before exporting files to the Headcam Orienteering app. You must find instructions for this on the web (this may be updated later).
Export files from Quickroute (for use in Headcam Orienteering app):
Prerequisite: The route is adapted to the map and all controls are marked with a circle.
Prerequisite 2: Adjusting Route Transparency so that the route cannot be seen on the map (adjusted with the Route Transparency slider)
Create a folder for videos and export files and use it for all the files
Export image file, go to File-> Export-> Image, give it a file name and select eg 100% size and 80% in quality.
Export GPX: go to File-> Export-> GPX and enter file name (.gpx)
Export of route data: go to File-> Export-> Route data … – “Sampling interval in seconds” = 1 (default), and make sure that in addition to the default selected fields, also selected: Lapnumber, Time (Lap) , Route Distance.
The Headcam Orienteering Application
Download the app here on my private Google-drive, its programmed by me but anyway is it a good idea to viruscheck after download.
Programmet har ændret udseende og ser helt anderledes ud – er under udvikling – mere info kommer.
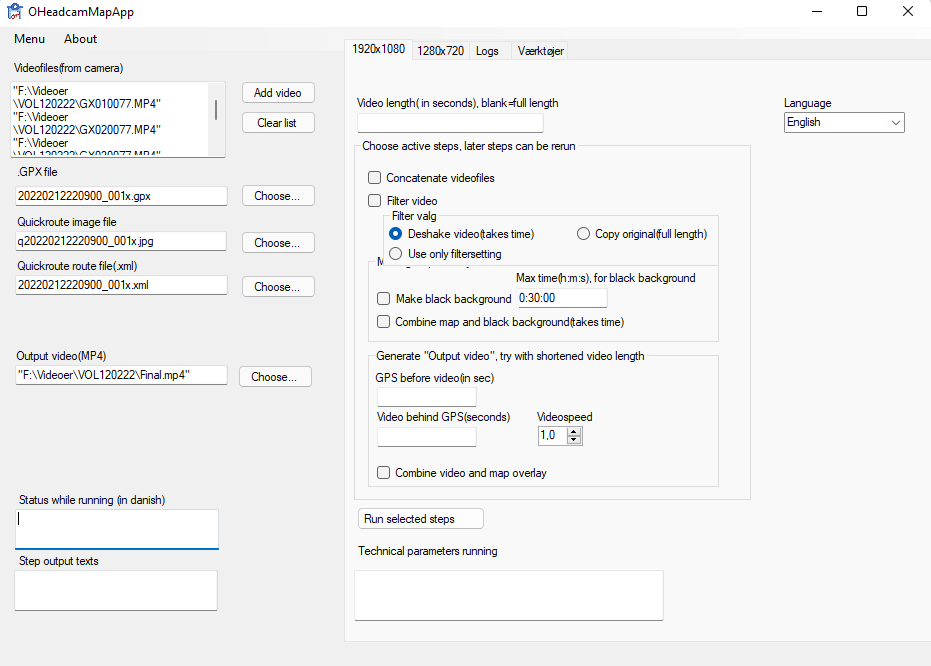
- First open the program and select language to the right – after selecting the language restart the program – you can choose between english and chinese. There can be missing translations but should be easy enough to understand any way.
- First of all prepare in Quickroute before using the program and you should now have 3 files from Quickroute:
A) .gpx file exported from Quickroute, not the original
B).jpg file with map exported from QR, not the original
C).xml file exported from QR with routedata - You only has to use the 1920×1080 tab
- In the videolist clear the list with the button
- Choose each videopart from f.i. GoPro in the order they are recorded by multiple clicks on the Add Video button
- Choose each Quickroute file corresponding to the file type in the fields
- Choose a Output folder and name
- Time to select and run the steps first go
- Keep the Video length field blank
- Mark Concatenate videofile
- Mark Filter videos
- Mark either Deshake or copy, or the Only filter option(filters is set the Menu->Settings), Deshake and filters takes extra time.
- You need to know the total length of all the selected videoparts together, and you will use that time hh:mm:ss in the Make Black background Max time.
- MArk the MAke Black background option
- MArk the Combine map and black background option
- Important: Unmark Combine Video and map overlay option
- Ready to run for the first time: Press the Run selected steps button
- AFter some time, can be hours, depending on deshake choice and length there will be a “Finished” text in the output status window to the left. There will also be different information for each step in the two status windows, while running.
- When its finished its time to adjust the GPS to the video:
- Unmark all previous steps
- MArk ONLY Combine map and black background option
- Try to f.i. fill 300 (seconds) in the Video Length field in the top.
- If you suspect some start delay in the GPS fill in some seconds in the GPS before video field, normaly the video is started before the GPS, so it lacks behind, You can also use the other field.
- Press Run selected steps
- Find the output folder and play the video to see if the map is synchrone woth the video – often you need a couple of tries to hit the right place – its often a good idea to have multiple controls or path junctions/crossings to adjust the time gap.
- As last step you clear the Video Length field and run the combine step for the whole video.
Extras: There is settings int the MEnu->Settings to adjust the placement of both maps on the video and also to set the transperency – and more.